
The global ecommerce market is projected to surpass $7.9 trillion by 2027 — and yes, you read that right.
With online shopping continuing to skyrocket, simply having an ecommerce store isn’t enough. To stay competitive and maximize your visibility, you need to leverage powerful advertising tools like Google Shopping Ads.
In this guide, we’ll walk you through everything you need to know about how to create Google Shopping Ads and start driving qualified traffic to your products.
Contact us online to get professional Google Ads services that boost your Shopping Ads and help maximize your business growth.
What are Google Shopping ads?
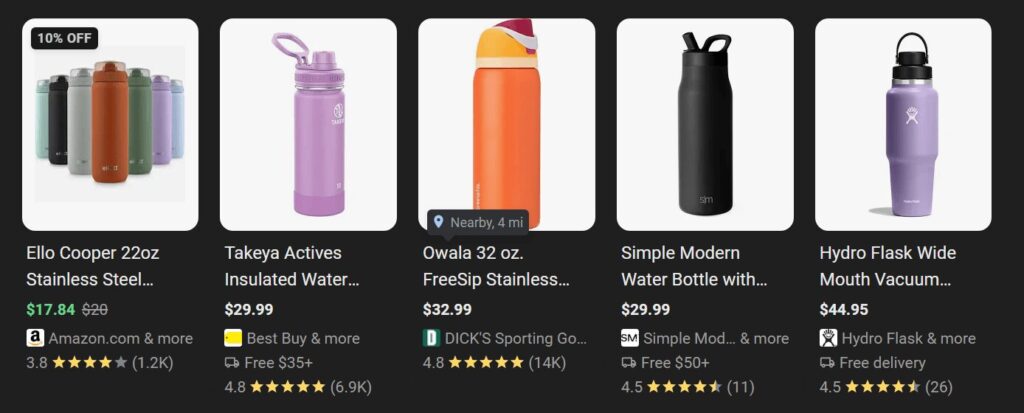
Google Shopping ads are visual product ads that appear at the top of search results when someone searches for a specific item. These ads include:
- Product image
- Product listing title
- Price
- Where to buy
- Product rating
Requirements before setting up Google Shopping ads
Before we dive into how to create Google Shopping ads, there are a few things you need to do in advance before you can even think about setting up your campaign.
Here are a few things you need to do:
- Set up accounts: To launch Google Shopping Ads, you’ll first need to set up both a Google Merchant Center account and a Google Ads account. Once created, link them together to start running your Shopping campaigns seamlessly.
- Create a shopping feed: Within the Merchant Center, create a shopping feed with all the products you want to promote. Create a spreadsheet to submit to Google that includes (at a minimum) Product ID, product title, link to product, image link, and price.
- Make sure you can sell your products: Google’s Shopping ads policy is different from their Google Ads policies. Make sure that your business, products, and website meet their requirements before you advertise.
Not sure how Google Ads fits into your marketing strategy? Explore how it works and what it can do for your business.
How to create Google Shopping Ads in 10 minutes or less
If you’re ready to start creating Google Shopping Ads, follow these steps to launch your first campaign!
‼️Keep in mind: These instructions are for standard Shopping campaigns!
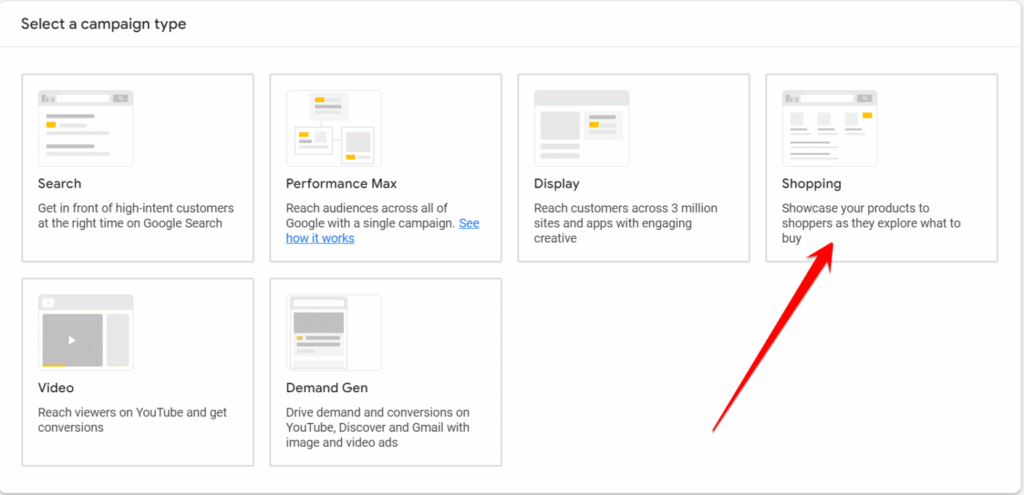
1. Create a new campaign
The first step to launching Google Shopping Ads is creating your new campaign. You can do that by following these steps:
- Select Shopping as your campaign type
- Log into your Google Ads account
- Click the Plus button
- Select New campaign
- Choose your objective
2. Select your Merchant Center account
Next, you’ll want to select the Merchant Center account that has the products you want to advertise. If you already linked your accounts, you should be able to select the Merchant Center you set up.
If you don’t see any accounts at this step, you’ll need to link your Merchant Center and Google Ads accounts first.

3. Set your advertising preferences
At this step, you’ll set up the bulk of your campaign. Here are a few things you’ll want to determine:
- Campaign name: Give your campaign a distinguishable name, so you know how to look for it later. You can always change the name after you create the campaign if you aren’t sure what you want to call it.
- Bidding type: Determine what type of bidding you want to use in your campaign. You can also opt for Smart Bidding and have Google set the right bid type for you.
- Daily budget: Set the amount you’re willing to spend on your Google Shopping ads each day.
- Networks: Shopping campaigns can show up in different places (not just search results), including Google Search Network and Google search partners. If you don’t want your ads to appear in these places, you can uncheck boxes for any networks you want to exclude.
- Devices: Ads can appear on any device. Adjust this setting if you only want your ads to appear on certain devices.
- Locations: Want to limit where you ads show? Adjusting this setting will help you limit where your ads show to narrow the focus on specific locations.
Here are some additional, optional settings you can tweak:
- Inventory filter: You only need to tweak this setting if you want to limit the number of products used in your campaigns. You can set criteria that a product has to meet to be advertised.
- Local products: Choose this option to enable ads for products sold in local stores. This option is great if you want to drive people to buy from your local store.
Once you’ve adjusted all your settings, you can save and continue.
4. Create your ad group
After you have your ad settings ready to go, the next step to creating Google Shopping ads is making your ad group.
Ad groups include individual products ads that are created automatically. These are generated using information provided in your Merchant Center account.
There are two things you’ll need to set before saving:
- Bid amount: Determine your bid amount for the ad group. Once you do this, the bid will be applied to the first product in the ad group.
- Ad group name: Give your ad group a name so you can easily find it later.
Once you do this, you can click Save.
That’s it! You can launch your ads and start selling your products through Google Shopping ads.
Need help launching your Google Shopping ads?
If you want to increase online sales, Google Shopping Ads are a powerful way to connect with high-intent shoppers right when they’re searching for products like yours. It’s one of the most effective strategies to get your products in front of ready-to-buy customers.
Don’t have the time or expertise to manage your Google Shopping campaigns? Swyftcode’s team of Google Ads Certified experts is here to help. We specialize in building, managing, and optimizing Shopping campaigns to maximize your return on investment (ROI).
Ready to boost your company’s revenue? Contact us online today to speak with a strategist and get started!